With the rise in the digitalizing of businesses and most of the customers seeking the online route for purchase, it is logical to start a website. Not only it will help you make a brand for yourself but it also opens the door to globalizing your business. A few years ago, creating and launching a website was tough. But now, it’s almost a cakewalk. All thanks to the advanced blogging tools and solutions. Although, if you are a newbie, you will still face a lot of problems if you don’t have proper guidance. But I am not going to let this happen to you as I am going to uncover all the steps required to setup a blog in this guide. I bet that if you follow this guide, you will setup a blog in less than 30 minutes. Before we go any further, here’s my checklist on how to setup a blog in less than 30 minutes –
Step 1 – Choosing a profitable blogging nicheStep 2 – Figuring out the right platform to setup a blogStep 3 – Find a suitable domain name for your siteStep 4 – Hosting your site on reliable hosting servicesStep 5 – Installing WordPress, finding a suitable WP theme, and install essential pluginsStep 6 – Writing and publishing your first blog postStep 7 – Integrating Google Analytics & Google Search Console
Now, we dive deep into these steps. Starting with…
1. Choosing A Profitable Niche For Your Blog
When I started this blog, I had recently come out of my 9-5 job. Don’t get me wrong, my job wasn’t bad as I was already doing what I loved i.e. digital marketing. But my thirst for blogging and making a brand out of it pushed me to leave it. Nevertheless, it was the best decision I have ever made. And, later, this decision ignited the idea to start MyWPLife. Since I was already well versed with top digital marketing tools and software, I decided to write about them and help new businesses, bloggers, developers, etc. find the right software. As you can tell by now, this is my blogging niche – business software, tools, and resources. Similarly, you too must have something that you are passionate about… That can be your blogging niche. Apart from this, here are some more popular blogging niches that generate the good income –
Health & FitnessMarketingTechnology & GadgetsSEOYoga or exercisesFashion & LifestyleMusicTravelSoftware reviewsFood & recipesSportsFinanceInsuranceReal estate
… and much more. What I am trying to say here is that in the current digital world, you can generate income from any niche. You don’t have to be an expert on the topic. On the contrary, a good amount of interest and genuine views will do the trick for you. But to be on the safer side as it is your first endeavor, I would suggest you go with something that you know about. To be sure that you are on the right path, you can check if your niche has any published books, questions on forums, Facebook groups, Instagram hashtags, etc. If yes then you are all set to proceed to the next step which is –
2. Picking The Right Platform To Setup A Blog
When it comes to picking an ideal platform to start a blog, a lot of new bloggers make the mistake. This mistake so grave that it seems impossible to recover from it. You’d need a do-over. Don’t worry, I am here to help you decide which platform should you choose. Ideally, our conventional and conservative minds would tell us to opt for free platforms like Medium, WordPress.com, Wix, Tumblr, Blogger, Weebly, etc. Logically thinking, it is a great option… But when it comes to usability, flexibility, and efficiency, the free platforms fail to deliver the ideal results. Moreover, it would be extremely difficult to convert your free blog site into a full-fledged brand later. That’s why you must look for those blogging platforms that may charge you fees but in return, they grant you complete access, liberty, and flexibility to mold it into a brand. Speaking of one such platform that is used by more than 33% of sites on the Internet is WordPress.org. And, when it comes to the market share among other blogging platforms, WordPress.org holds more than 60%. Some of the top organizations like New York Post, BBC, Wired, etc. use WordPress.org for their websites. The reasons behind such a huge number and popularity are that it is 100% free to use, offers complete freedom & flexibility to setup a blog. And, not to mention, it is extremely simple to use and get started with. Although, despite being completely free, websites made on WordPress.org are self-hosted. Meaning, you’d have to register for a domain and host your website with the help of a reliable hosting service provider. We’ll discuss this in the next steps but for now, let’s lock WordPress as your blogging platform and learn how to setup a WordPress blog.
3. Deciding A Suitable Domain Name For Your Site
The first step that you should complete in order to set up a WordPress blog is to decide an apt domain name for your website. If you don’t know what domain name is, I’ll help you explain. Check out the link in the URL box of your search engine. It may look like mywplife.com… That’s it..!! mywplife.com is my domain name or domain address. Now you must be wondering as to what importance does it hold in setting up a blog. Well, a domain functions as a web address of your website. The Internet offers plenty of virtual real estate space. This space is acquired by registering for a domain name and hosting a website on it. If you are still having trouble understanding the concept, try to see it like this… You have a house and your house has a unique address. This address helps people to reach your home. Similarly, on the Internet, your website functions as a house and its domain address functions as an address so that Internet users can find you by following that path. Isn’t this too easy? Now comes the tough part – choosing an ideal domain name for your website. Here are my personal guidelines that you must follow to come up with a good domain name –
You should keep your domain name short, simple, and easy to remember.Always choose the .com domain extension.Cross-check if your shortlisted domain names are fresh or expired ones.Don’t use a domain name that includes a trademark name, for example – wix-blogger.com, etc.
Once you finalize your domain, you are all set to register it. The usual charges applicable are $10-15/year. But by following the next step, you can get this for free for your first year.
4. Registering Your Domain & Hosting Your Site
The next step in this guide on how to setup blog requires you to register a domain name, followed by hosting your website on a suitable service. As promised, I am going to tell you how you can get 1 year’s worth of domain registration for free. But before that, you must focus on finding a reliable hosting service provider. Now, in order to get the best hosting experience, here are some key points you should keep in mind –
The corresponding service should have a good reputation and maybe popular.You should look for good server uptime records, preferably above 99.5%.In addition to this, you must always check how much storage space and bandwidth are available.Check for free features like SSL certificate, security, access to cPanel, etc.Some of the hosting services also offer professional email addresses for free. If it is available then it is good.Lastly, you should also check how helpful and prompt their customer support are.
With the availability of so many options, each claiming to be the best, it will be extremely difficult for you to finalize the best among them. That’s where I come in to provide you my expert insight. I am going to recommend Bluehost. “Why”, you ask? For starters, Bluehost is one of the three hosting services that WordPress itself recommends. It is one of the most experienced hosting services, catering to millions of websites for 17+ years now. It also offers plenty of free services and features like SSL certificate, sub-domains, etc. And, most importantly, it offers free domain registration for 1 year. Another reason for recommending Bluehost is because I too am using it for my websites. And, believe me, when I say, I have never been disappointed with it.
4.1 Registering Domain & Hosting Site On Bluehost
If offering free domain registration and other hosting features wasn’t enough, here’s one more incentive – If you simply type bluehost.com and visit its pricing, you will see that the WordPress hosting plans start at the rate of $3.95/month. But I am not going to let you spend any extra money on hosting and domain registration… Disclosure: I am recently partnered with Bluehost. If you purchase Bluehost above mentioned referral link, I’ll earn small commission at no additional cost to you. Even, you’l get 60% discount plus free domain name for a year. If you click the below-mentioned button and purchase Bluehost, you will get 60% discount. Moreover, you will get free domain registration for one year which generally charge you $10-15/year. As you can see, instead of charging you more, I am trying to get the pricing even lower… Nevertheless, I can truly vouch for Bluehost as MyWPLife.com is hosted on its servers. Moving along, once you click the above-mentioned button, you will land on the Bluehost home page. If you could look closely, you’d be able to see that a $2.95/month discount is automatically applied. Next, since you are just starting out, select the Basic plan on its pricing page. You can always upgrade later as per your requirements…
4.1.1 Create A New Domain
After selecting the Basic plan, Bluehost asks you to enter your chosen domain name for registration purposes. If you haven’t already checked if it is available for purchase or not, you can check it here. Bluehost automatically detects and informs you if it is available for purchase. In addition to this, you can also host/add your other new domains too. But for now, simply add your domain address and click the Next button.
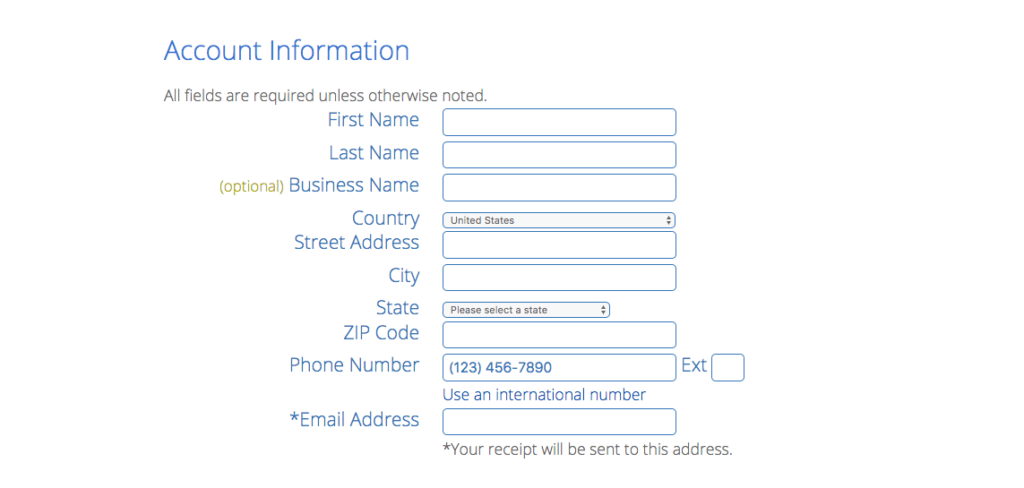
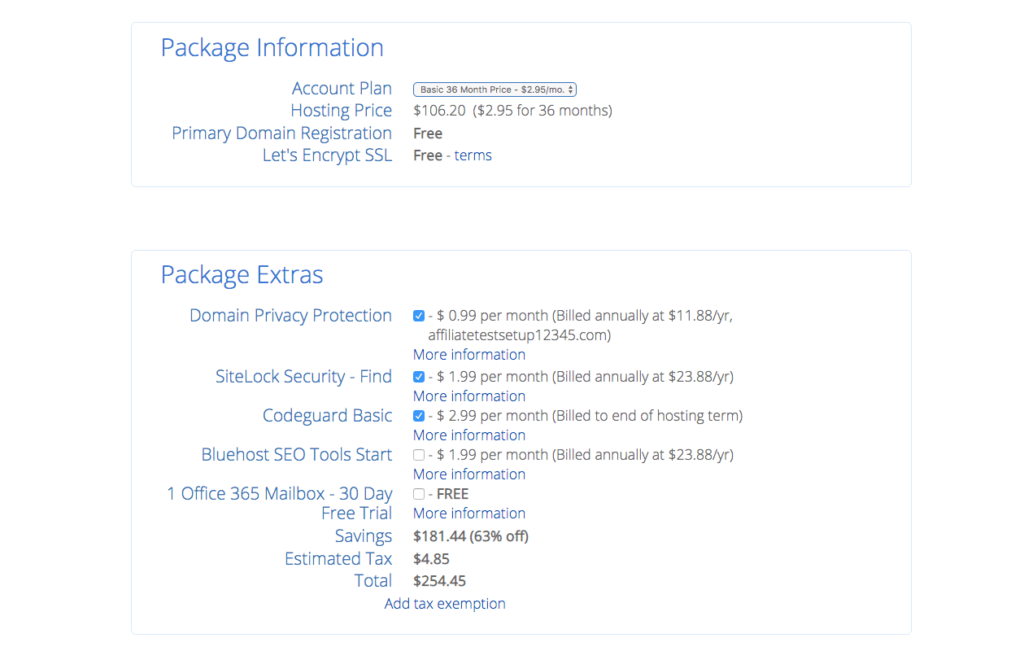
4.1.2 Fill Account Details For Hosting
Once you click the Next button after submitting your domain name, you will be prompted to enter your account details. These details are essential and required by the hosting service companies. In addition to this, you also have the flexibility to select the add-ons for your hosting plan.
The add-ons can offer benefits like –
Domain privacy protectionWebsite securitySEO tools and featuresProfessional email address
You can choose as many as you like or completely ignore them. It’s up to you. Now, after entering your details and choosing the add-ons, you have to enter your payment details. Just agree to Bluehost’s terms & conditions and click on the Submit button. At this point in the guide about how to set up WordPress blog, you have successfully registered a domain and bought hosting for your website. The next step calls for adding a website on your hosting server. For this, you’d have to follow the next steps…
5. Setting Up Account & Installing WordPress
The foundation of setting up a website that will earn money has been set. Now, you are all set to raise a pillar… It means that you can now set up your hosting account, website, and then install WordPress. To go with the flow, we will first set up your hosting account. After completing the payment process in the previous step, you have to first create your account password. Know that this is for the hosting account and not for the WordPress login. Make sure to keep your password as unique as possible by using random characters. Next, after creating a password, you will have to login again in your Bluehost hosting account. Use the email that you have entered while purchasing the hosting and the password that you have just now created. After logging in, you will enter the Bluehost’s onboarding process for new websites. The first step of this process asks you basic details about your website such as –
Your site name (example, MyWPLife)Your site’s tagline (example, Get The Best Software Here)
And, also the nature of the website i.e. a blog or an eCommerce store. If you are trying to create a blogging website similar to mine, pick the blog option. Post this, you will be asked about your goals for your website. This step certainly helps decide Bluehost, the kind of website you are trying to make. And, based on your choices, Bluehost will offer related WordPress themes in the coming steps. Lastly, don’t forget to select your website creating experience. Don’t be ashamed of having little experience. We are here to grow and we’ve got to start somewhere. Select the apt option and move forward.
5.1 Choosing Suitable Theme For Your Website
According to your recently submitted answers, Bluehost will offer you several WordPress themes for your website. Just as the canvas is used as a medium to convey art, similarly, choosing the right theme will help you convey your thoughts & ideas in a textual manner. Since you are trusting me with the recommendations, I am going to recommend you the theme that I am using for MyWPLife. Without any doubt, pick GeneratePress. This theme is the perfect lightweight theme for bloggers. And, not to mention, it is 100% responsive too. If you are having trouble believing me, allow me to present some usage stats of GeneratePress. Until now, GeneratePress has been downloaded 2,884,000+ times and is currently used by 300,000+ websites. Simply because it is efficient and also offers numerous free and premium site templates. All you have to do is find the one you like and install it. Now that you are convinced that GeneratePress is the best WordPress theme, you can go ahead, find it in the given list, and select it. If you are unable to find it, make sure to search it in the Blog section of the theme library given by Bluehost. Lastly, if GeneratePress isn’t available on this list, don’t worry, I’ll tell you how to install and activate it from your WordPress dashboard. For now, just choose any theme and move on to…
5.2 Installing WordPress
Now comes the most important task of all… Installing WordPress! If I had taught you how to set up a site (with the help of WordPress) a few years, it would have been a different experience altogether. Simply said, it would be extremely difficult and cumbersome. But with the technological advancements, you won’t have to face any hardships. Back in the day, installing WordPress was difficult and only developers could install it. Things have changed now… Now, with the help of Bluehost, you can install WordPress in just a single step. So after choosing the theme in the previous step, Bluehost automatically installs WordPress for you. I hope you now see how much value Bluehost is providing you… Moving forward, after the installation process is completed, Bluehost takes you back to your hosting account dashboard and will showcase your newly created website. That being said, it’s time for you to further customize your new blog with new design, features, and functionality. For this, you’d have to…
6. Install WP Theme & Essential Plugins
Before we go any further, allow me to congratulate you on setting up a new website. But the job is half done..!! Since your websites are newly created, it may lack certain features and visual appearances. So to rectify this, we must…
6.1 Install GeneratePress WordPress Theme
If you were able to find the GeneratePress theme in the previous steps, you can simply move forward to the plugins installation step. However, if you haven’t you must first open up your WordPress dashboard by clicking the Log In To WordPress button available in your Bluehost account dashboard. On clicking this button, you will be automatically logged into your WordPress account. Here’s how your WordPress dashboard may look like – Now, in order to install the GeneratePress theme, you’d have to follow this path – Dashboard → Appearance → Themes. The Themes page will show the currently active theme. Find the Add New button available on the top and click it. And, then in the search box, enter GeneratePress. In a matter of a few seconds, GeneratePress will appear and then you can install it and then activate it. Great job.!! Now have successfully installed the theme. You can customize it to match your visual expectations or do it later. Apart from this, there are several other things that must be customized and the most significant among them would be –
Your Site IdentityColor schemesSite layout and typography
Additionally, you should also head over to Dashboard → Settings → Reading and select your Homepage and Posts page. Next, you must add some important plugins to strengthen your website’s performance.
6.2 Installing & Activating Plugins
You must be wondering what exactly are plugins? Plugins are additional software or add-ons that can be added to your website to improve its set of features, functionality, ease of use, etc. If you have chosen a free blogging platform like Medium, Blogger, etc., you will not have such customization options. You would have been stuck with just the basic features. But thanks to WordPress, not only it will help you set up a blog site and make money but it also empowers it by adding extra features (in the form of plugins). So to install a plugin, you must go to – Dashboard → Plugins. Since this is a fresh WordPress install, there will be a handful of plugins that have been automatically installed by Bluehost. To install a plugin of your choice, you must click the Add New button. You will then have the choice to upload the plugin file or search and install it. For the sake of convenience, let’s opt for the latter method. But hold your horses… To be honest, there are many feature options for a WordPress site. And, since you are just starting, I would recommend some of the key plugins for your new site…
6.3 What Are The Essential Plugins?
When it is said that you can add any kind of features (plugins) you want then our curious minds would haphazardly install irrelevant plugins. You should refrain from doing this. Instead, install and use some of the essential plugins that I am going to recommend to you now.
Website Backup – You can choose UpdraftPlus to create a backup of your website. The plugin can save the backup files to your Google Drive or Dropbox account.Contact Form – To offer a way to your subscribers to reach out to you, WP Forms or Contact Form 7 plugins can be installed.Anti Spam – New blogs are often hit by spam comments and malicious form submission. To combat this, I would recommend Akismet.SEO – SEO plays a vital role in the growth of any website. For this, I use the Yoast SEO plugin and would also recommend you too.Caching – To make your site blazing fast, plugins like WP Rocket and W3 Total Cache does a great job.Image Compression – More often than not, images consume a lot of server resources. This ultimately results in poor loading time. To combat this, I use image compressing plugins like Smush.Insert Code Snippets – These plugins will enable you to insert code snippets in your header/footer. These inserted codes will add new functionalities like live chat widget, etc. to your site. This type of plugin also helps in integrating Google Analytics. My recommendation is Insert Headers and Footers plugin.Affiliate Links Tracking – To run a successful blog that makes money, you’d have to make use of affiliate link tracking plugins. I’ve been using the Pretty Links plugin for this purpose and also for link cloaking.
Believe me, when I say, I am still using these plugins for all of my websites. These are of utmost importance..!! With that being said, you have now successfully learned how to set up a site on WordPress. But why stop here? Let’s move forward to…
7. Publishing Your First Blog Post
I assume that one of the prime reasons behind setting up a blog site is that you can share your thoughts, views, etc. in the form of articles. Make no mistake, these articles have a lot of earning potential too. But you must first learn how to publish a blog on WordPress. Instead of starting writing directly in the WordPress posts, I would suggest you first draft your content on Google Docs or MS Word. That’s what I do and evidently, it boosts my working efficiency. It’s completely up to you to adopt this process or not. Nevertheless, the end goal of any process should be to publish a detailed and well-formatted blog post. To start the publishing process, you must first Add New Post by following the path – Dashboard → Posts → Add New. Now, use the required blocks like Headings, Paragraphs, Lists, Buttons, etc. to format your content. Or simply, copy-paste it from your Docs or Word file. While drafting the blog post, be sure to list it in the relevant category. And, most importantly, customize its permalink. Since you have already installed the Yoast SEO plugin, it will help you optimize it for SEO. Once you are satisfied with the layout, formatting, and drafting of the post, you can hit the Publish button to publish this blog post. With this, you have successfully published a blog post. Now comes the part where you must measure how well your website and blogs are performing. For this, you must integrate your site with Google Analytics and Google Search Console.
8. Integrating Google Analytics & Google Search Console
In the quest to learn how to set up a blog site and make money, we’ve come to the final step. The completion of this step will ensure that you have all the resources required to measure the performance of your blog posts and website in total. I am talking about Google Analytics. In addition to providing insights on daily or monthly site visitors, Google Analytics also helps you track your goals, understand visitor behavior, track their geographic location, and much more. When it comes to Google Search Console, the successful integration sends a signal to Google that says that your website is ready to index and appear in search results. It extends its benefits by allowing you to see how Google is indexing your blog and by permitting you to track performance in terms of Google search. Having said that, it’s time for us to integrate them. Starting with…
8.1 Integrating Google Analytics
We are integrating Google Analytics first because it simplifies the Google Search Console integration significantly. To start things off, open up Google Analytics in the new tab. There, you would be able to find the Admin menu, available in the left hand sidebar. Click and open it. Next, you’d have to create a new account by adding a suitable name. You will be then asked – What do you want to measure? Since your site represents a blog, simply select Web. With this choice, you will be able to measure all the required metrics. You won’t need anything else. After this, you would have to set up the property. To do so, you simply have to enter your site’s name, domain address, and select a suitable category. That’s it! Once you click the Create button, you will be given a code snippet that you must insert in the
tag of your website. Don’t know how to do this? Relax, I’ve got your back. Do you remember that I have suggested you to install Insert Header and Footer plugin? We are going to use it for code insertion. Now, first, copy the snippet code given in Google Analytics. Then open up your WordPress dashboard and go to Dashboard → Settings → Insert Headers and Footers. Once you open the plugin, you will have two choices –Add code in the headerAdd code in the footer
Choose the Header option and then paste the copied snippet code. Don’t forget to save this code. If you complete this then it means that your Google Analytics integration is successful. The codes snippet you just inserted will handle all the tracking and also help in integrating Google Search Console.
8.3 Integrating Google Search Console
To start the integration process, open up Google Search Console in a new tab. You will be then asked to choose the integration method from –
DomainURL Prefix
Choose the URL Prefix method and enter your domain URL as https://yourdomain.com (https://mywplife.com). Click Continue. In the next step, you will be given 5 choices of verifying your domain ownership. Select the Google Analytics option. If you choose this option, the setup wizard will inform you that to continue with this option, you must add the Google Analytics tracking snippet code on your website. Since we have already added this code using “Insert Headers and Footers Plugin“ (it is a free plugin) while integrating Google Analytics, you can move forward and click the Verify button. With this, you have successfully integrated Google Search Console.
All Done. Now What?
Now that you have learned how to set up a blog on WordPress, I can only wish you good luck for your future endeavors. That being said, I would also like to advise you to publish blog posts regularly. It will ensure that you start getting enough traffic for your site, which will ultimately help you make money. Lastly, if you have any queries or if you are stuck at any step, feel free to contact me. I’d love to help you out. You may also like:
Cheap Web Hosting ProvidersBest Alternatives to WP EngineCheapest SiteGround Alternatives