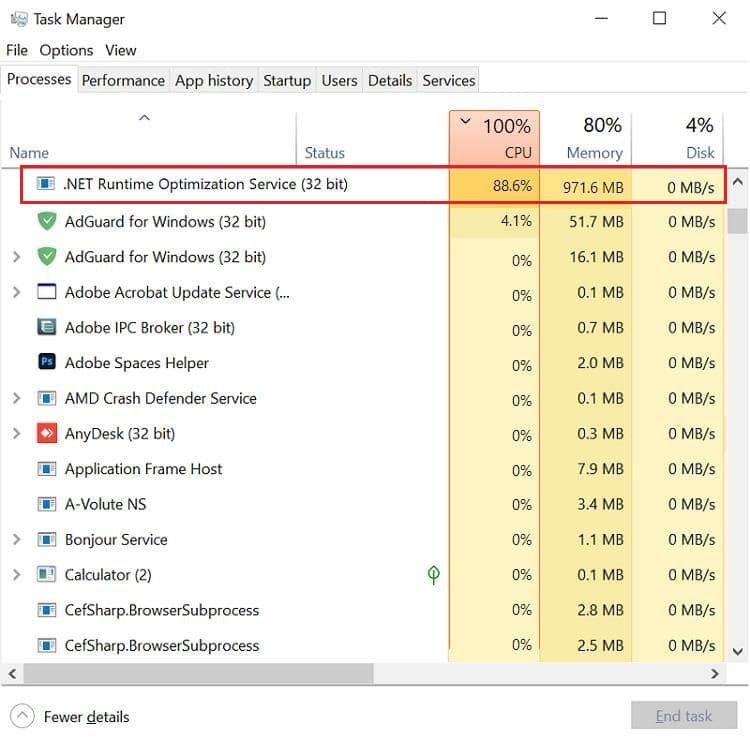
How to Fix .NET Runtime Optimization Service High CPU Usage on Windows 10
As you might be aware, this .NET framework is used by Microsoft and other third parties for developing and running Windows applications among other things. The executable file for this service, named mscorsvw.exe, is an official Windows component and performs the task of optimizing .NET framework viz pre and re-compiling .NET libraries. This helps applications and programs launch faster. The optimization service is designed to run in the background when your PC is sitting idle for a brief period of 5-10 minutes.
How to Fix .NET Runtime Optimization Service High CPU Usage on Windows 10 Why .NET Runtime Optimization Service Results in High CPU Usage? Method 1: Perform Clean Boot of PC Method 2: Boost .NET Framework Processes Option I: Via Command Prompt Option II: Via GitHub Script Method 3: Restart .NET Runtime Optimization Service Method 4: Detect & Remove Malware
Why .NET Runtime Optimization Service Results in High CPU Usage?
Sometimes the service can take longer than usual to re-compile .NET libraries. This results in
Your PC service running slower than usual. Glitch instances in your computer. The service rendering corrupt. Utilization of system resources by malware.
Considering the impact of this service on individual app performance, its immediate termination at the first sight of mischief is not recommended. If the service seems to be taking too long to finish its operation, you have the option to speed things up by executing a few commands or a script. Other fixes include scanning the computer for malware and viruses, restarting the service, and performing a clean boot, as explained in the next segment.
Method 1: Perform Clean Boot of PC
It is quite possible that the service is having a hard time recompiling the libraries for a particular third-party application and is therefore, consuming more CPU power to finish the task. You can perform a clean boot wherein only essential drivers and startup programs are loaded, to examine if it is indeed one of the third-party programs prompting the high CPU usage issue for the .NET Runtime Optimization service. The steps to perform Windows 10 clean boot are as follows:
Press Windows + R keys simultaneously to launch Run dialog box.
Type msconfig and hit the Enter key to open System Configuration.
Go to the Services tab and check the box marked Hide all Microsoft services.
Then, click on the Disable All button, shown highlighted. It will stop all the third-party and unnecessary services from running in the background.
Save the changes by clicking on Apply > OK buttons.
A pop-up enquiring whether you would like to Restart or Exit without restart will appear, as shown. choose the Exit without restart option.
Again, launch the System Configuration window by repeating Steps 1-2. Switch to the Startup tab.
Click on the Open Task Manager hyperlink, as shown.
Note: Check the Startup impact column for all the listed applications/processes and disable those with a High Startup impact. 9. Right-click on the application (e.g. Steam) and choose Disable option, as depicted below.
- Finally, close down all the active application windows and restart your PC. It will start in a clean boot state.
- Now, check the .NET Runtime service CPU usage in the Task Manager. If it is normal, enable third-party programs one at a time to pin down the culprit application and uninstall it to avoid such issues in the future. Also Read: How to Fix hkcmd High CPU Usage
Method 2: Boost .NET Framework Processes
Since terminating this service is not an option, you can instead give this service a little boost by allowing it to use additional CPU cores. By default, the service only uses one core.
You can either execute a couple of commands yourself or simply download an official Microsoft script from GitHub and run it.
Option I: Via Command Prompt
Click on Start, type Command Prompt and click Run as administrator, as shown.
Type the given command and press the Enter key to execute. Note: The commands that need to be executed differ based on system architecture.
For 32-bit systems: cd c:\Windows\Microsoft.NET\Framework\v4.0.30319 For 64-bit systems: cd c:\Windows\Microsoft.NET\Framework64\v4.0.30319
- Next, execute ngen.exe executequeueditems, as depicted below.
Also Read: Fix Steam Client Bootstrapper High CPU on Windows 10 Pro Tip: Determine if Windows PC is 32-bit & 64-bit If you are not sure about your system architecture, simply follow the given steps:
- Hit Windows + R keys together to open Run dialog box.
- Type msinfo32 and click on OK to open System Information window.
- Here, check the System Type label to check for the same.
Also Read: What is HKEY_LOCAL_MACHINE?
Option II: Via GitHub Script
Go to the GitHub page for the script.
Right-click on the Raw button and choose the Save link as… option, as shown.
Change the Save as type to Windows Script File and click on Save.
Once downloaded, open the file with Windows Script Host. Also Read: Fix DISM Host Servicing Process High CPU Usage
Method 3: Restart .NET Runtime Optimization Service
Services can often glitch and then, exhibit strange behavior such as utilizing unnecessarily high amounts of system resources or staying active for a prolonged period of time. The glitched instance can happen due to the bugs present in the current Windows OS build. Here’s how to solve .NET runtime optimization service high CPU usage by restarting the service: Note: This solution only works for systems with a dedicated NVIDIA-powered graphics card.
Press Windows + R keys simultaneously to launch Run dialog box.
Type services.msc and click on OK to open Services application.
Scroll through the list and locate the NVIDIA Telemetry Container service.
Right-click on it and choose Properties from the context menu, as shown.
Click on the Stop button first. Wait for the Service Status to read Stopped, and then click on the Start button to get it going again.
Make sure the Startup type: is set to Automatic.
Once the service restarts, click on Apply > OK to save the changes and close the Properties window.
Press Ctrl + Shift + Esc keys together to open Task Manager and check if the service still utilizes high CPU resources. Also Read: What is Google Chrome Elevation Service
Method 4: Detect & Remove Malware
If the service abnormal consumption of CPU persists, run a virus/malware scan to rule out the possibility of infections. Malicious applications can sneak onto your PC if you are not careful. These programs will disguise themselves and pretend to be official Windows components, and cause several issues such as high CPU usage. You can employ the native Windows Defender to scan your PC or you can use any other specialized security programs that come in handy. Follow these steps to fix .NET runtime optimization service high CPU usage issue by removing the malware from your PC:
Hit Windows + I keys simultaneously to open Settings.
Here, click on Update & Security, as shown.
Go to the Windows Security menu and click on Virus & threat protection
Click Quick scan to scan your PC to check if there is any malware present or not.
If there is any malware found then, click on Start actions to remove or block them and restart your PC.
Recommended:
Fix Touchpad Scroll Not Working on Windows 10 How to Change Startup Programs in Windows 10 How to Mute Microphone in Windows 10 7 Ways to Fix Computer Keeps Crashing
Hopefully, one of the above solutions has fixed .NET runtime optimization service high CPU issue on your PC. If the same issue comes back to haunt you later, check for available Windows update or reinstall the latest version of .NET framework. Also, if you have any queries/suggestions regarding this article, then feel free to drop them in the comments section.